Great Gadgets + Gizmo’s for your Iphoneography

Awesome Iphone camera gadgets via besotted blog

None of these gadgets or gizmo’s will make you a better mobile photographer, but part of the appeal of photography seems to be in the collection of gadgets or at the very least perusing some of the goods that are available so we thought we would show you some of the items that are on our current wish list.

Iphone goes pro

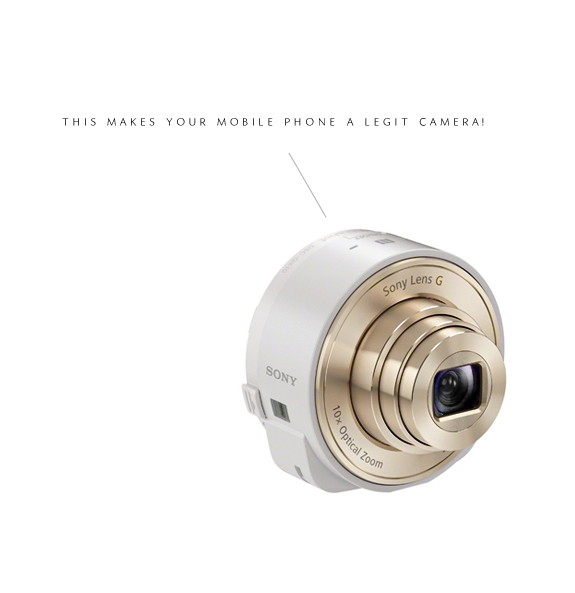
Sure there are many artists/photographers that can claim their living by shooting with their mobile phones, but Olympus just introduced a game changing device which makes your phone a legit camera–pro level folks. As Michelle pointed out, it’s more than a gadget it’s a replacement mirrorless camera. The device looks like it’s just a lens but the beauty is in the simplicity, I think it best to link to both the ‘camera’ and the video. Be prepared to be wowed. Not as savvy as the Olympus but just as cool is Sony’s offering which has the lens attached! There are two versions (here and here) both have there pros, but it may be best to view the video to see for yourself.

Mobilephone tripod

The Gorilla Tripod, I actually own this and have to say it is awesome! The camera is fitted into the tripod with an easy squeeze clamp (which makes it easy to re- position on the fly), the bendable legs make it perfect for attaching to precarious places, think along the lines of attaching to a chandelier to get over head food/selfie shots. Speaking of selfies this is perfect for creating an un-posed selfie, say of you looking out the window thoughtfully with the light just right, very Kinfolk. Just saying…

Instant mobile photo printing

I came across the Impossible Instant Lab the other day, a perfect gadget for the Polaroid enthusiast. Soft, dreamy, creamy instant photos printed from your phone’s library–instantly! Fuji has a printer option as well, but the photos are bit smaller (the same as their Instax camera).

5 Awesome Iphone Photo Tips you need to know!

5 awesome iphone photo tips via besotted blog

I took this with my phone the other day, it was a snack for E. which she promptly refused, so I decided to photograph it against my black t-shirt next to the window instead while E. was making me ‘pasta’, I manually adjusted my exposure using Miss Michelle’s tried and true (and such an eye opener) tutorial.

Today though I wanted to go over some palm thumping to the forehead moments I had while doing my research on taking better Iphone photos, some of these things Michelle didn’t even know and that’s always exciting for me, because it means I found some real gems. First up is exposure, gosh, for the newbie exposure is such a scary word, but it needn’t be, basically it’s how much light is let into a photo, it might be easiest to comprehend if you know that a very light photo is usually where you can’t see detail is overexposed and a very dark photo where you can’t see your subject is underexposed.

Exposure with the Iphone camera

That statement may seem oxymoronic because the exposure feature that comes with the Iphone camera is so lackluster compared to other camera apps–or is it?  I just found out a secret way to add even more light or add more depth with the Iphone camera simply by tapping on the image, the same square and sun will appear per usual but if you tap on the sun now a slider will appear where you can adjust the exposure even more by moving up and down. Visuals are always good, here’s one for you.Read More

Iphone Photography Resources | Write You on Your Heart

Iphone photography resources via besotted blog

When we were coming up with a theme for the week I kept coming back to mobile photography, since I feel horribly inept, like I have been winging it all this time and I so don’t want to be doing that when I am documenting my most precious (and fleeting) memories. I admittedly have trouble creating consistency since those ‘perfect’ to me moments aren’t at a specific time of day and spontaneity is key, so I find myself editing the photos to suit the light, which to be honest isn’t always the best. I figured if I was having trouble then maybe someone else out there reading (or Googling) might benefit from some of these resources. I am hoping to strike a balance between both helping the novice mobile photographer and maybe introducing some ‘aha’ moments for the seasoned one. Since I shoot with an Iphone and have more familiarity with it, some of the tips may sway that way, but a lot of the resources have some great information that will help any mobile photographer, with any device take better mobile photos.

Our first resource and really a biggie if you ask me, was finding ‘Write you on your heart’. It’s a blog by mother and photographer Alicia Brown and it is so well done! You definitely don’t need to be a mom to appreciate her easy + straightforward tips + tutorials. Alicia has a keen eye for spotting and featuring talent, I thoroughly enjoyed reading through her interviews and delighting in the inspiration and information that the guests revealed. Alicia wrote an e-book that I am sure is good if you are using her blog as a gauge, but of course you don’t want to invest in anything just yet, correct?  No problem, she also has what she calls ‘The Checklist’ that you can download for free, this single resource if you are a beginner should help you take better photos with your phone pronto!

We look forward to sharing what we have discovered when we went down this rabbit hole, and hopefully we have found the most interesting and easy to execute tidbits for you to master this skill, I know I am personally looking forward to learning more.

P.S. How beautifully quiet are these images by Christine Keegan?

Author / Miss Tristan B

Miss Tristan B. is the co-creator of the world’s best + easiest product photography editing tool-Foto Rx | Shopkeeper’s Helper and one of the writer’s of this delightful blog. Her lofty goal here is to make this a creative resource repository and to inspire you to fall truly, madly, deeply in love with your life.

Modern Calligrapher Interview | Diva Pyari

Calligraphy by Diva Pyari via Besotted Blog
Diva Pyari of Linea Carta was one of the first ‘modern calligrapher’s’ that I knew of that sold a kit, which I of course promptly purchased. I found it almost too gorgeous to use, the exemplar a little work of art. It was one of the first times I was introduced to tools that actually helped me gain some confidence in my burgeoning skill set and helped me to continue to pursue my love of lettering, for that I am grateful. We are thrilled to be able to add Diva’s interview to our long list of talented lettering artist interviews. Without further ado….
Where are you located?
Berkeley, CA

How did you get started in lettering?

I’ve been a lettering fan since I can remember!  My 2nd grade teacher Ms McIntosh had beautiful script, I completely idolized her.  when i was 10 my grandma gave me this little leather coin purse and sewing kit, and wrote my name on it in cursive.  I had no interest in the kit but was SO EXCITED because it had my name in her beautiful script.  I also remember how in 6th grade I befriended the girl who sat in front of me, Camille Farnsworth, solely because she had her own amazing style of penmanship — think Japanese:  Perfect and exact print — but then also with her own quirks here and there.  I tried out every art-store calligraphy kit, played with illustrative lettering, was always on the hunt for ‘a good black pen’, savoring the Blank White Sheet of paper..  As for developing my own calligraphy style, I was most inspired by Lauren McIntosh from the charming little shop Tail of the Yak in Berkeley.. About 6 years ago I walked in the shop and there were all these lovely little signs in her graceful hand, ‘Soap $1’ — it was nothing like i’d ever seen, full of personality. I went right up to the shopkeeper and asked who did that and do they teach classes?!  Later that year I was at her home copying her delightful calligraphy, and after a few months of obsessive practice one of my fellow students asked if she could hire me to do the calligraphy for her wedding invitations and address her wedding envelopes. That job led to others, and years later here I am!

What are some of your favorite supplies? 

 The Nikko G is my go-to nib, and I use Noodler’s bulletproof American eel Ink (waterproof and archival black) for many of my professional projects. I also love McCafferey’s Oak Gall ink, though a more transparent ink. I use gouache quite a bit, Windsor & Newton designers gouache, to mix custom colors. These days for projects I work mostly on Bond Layout Marker Paper– it’s smooth but picks up very subtle details. For brush lettering I like the Utrecht sablette size 0, and my favorite pen right now is by Muji (0.38mm hexagonal gel-ink needle tip).

Can you name some of your inspirations?

 Nature, the sky, the sea, my cuuuute dogs, travel, color (neons to pastels), friends & colleagues, packaging and design, light, a blank canvas..

Can you go a little into your process of how you work on a project? 

 It’s always best if I take time to clear my desk or work table to make space for each new project. working as an artist and running my own business i can get overwhelmed easily, and it really helps manage the overwhelm if i can tidy up for each new project. I love a stack of blank white paper– anything is possible!  I make a lot of messes, just putting it all down, freeing up my hand, and at each new stage of the project I clean up and make space again. and again!  For my custom clients, I’ll have them send images of work they like, and we make time to talk in person or on the phone.  I find our conversation is extremely important, particularly if I can get them to share their excitement about the event/project/brand.  That gives a feeling and a sense of them and the project, and I hold that feeling with me as I do the design work. I then show them some initial artwork for feedback.  Often its a hit right away, I love to hear that I was able to exceed the clients expectations!  And every now and then we work together closely, back and forth, to create the finished product. The latter can be challenging but wonderful too- it pushes me to design something more unexpected, and I do notice a sense of pride in that accomplishment.  When I’m designing for my own brand my process is different every time– sometimes its a quick and inspired work that flows, other times its an idea that gets put aside for months as I work it out in my off-time thoughts.  and its everything in between.

Any tips for newbies on how to develop their own style?

I love that Pablo Picasso quote:  ‘learn the rules like a pro so you can break them like an artist’.  So first things first, get really comfortable with your tools – your pen & nib. have patience, this will take time! Practice all the fonts out there that you love. Eventually when you’re not trying so hard and you’re in the flow (maybe write a letter or a note from your heart), your own hand will naturally come through. see what it looks like and play with it, refine it, have fun with it!

Any recommendations of books or classes for lettering enthusiasts to further their studies?

I sell my calligraphy starter kit, workbook, and A-Z chart online– and even better if you can make it to one of my workshops for hands-on guidance!  i also teach an intermediate workshop, and my workbook no. 2 will be available soon.

Do you have some favorite projects you would like me to mention? 

Any advice on what ‘not’ to do?
Don’t give up!  Any new skill takes lots of practice, and calligraphy even more so. I’ve been drawing and lettering my entire life, and most would say it comes easy to me, yet still my first months of calligraphy (practicing for hours daily!) were not very pretty.  So don’t listen to that inner critic and keep at it– think of it as a meditation, cultivating patience, and remember that being a beginner does not last forever.

Will you ever be doing any workshops?

Yes! I teach regularly at Handcraft Studio School in Emeryville, CA(the SF East Bay), and I’m also ready to travel!  In fact, I’m planning a 2016 European tour of my workshops and would love venue/partner ideas for London, Paris, and Rome. I’m also organizing a Southern Italy Retreat — think Slow Art:  At home in a beautiful villa, living like a local, eating fresh and traditional foods, swimming in the Mediterranean, and making art every day!  Email me if you’d like to be kept in the know:  diva@linea-carta.com

Name one random talent you have that people may not know?

I speak Italian ;)


A collection of vintage inspired hand drawn fonts

A fine collection of vintage inspired hand drawn typefaces

We’ve written about artist/designer Edurado Recife before, because it would be a shame not to, such a talent! Most of his fonts came about to use in his own work which is ephemera/collage based with just enough edge to make it not feel granny. We just found out Eduardo’s foundry Misprinted Type is having a huge sale, 50% off of every font family, a rare, rare occurrence that we felt needed to be mentioned a.s.a.p.! Some of our faves are the King Bloser, a gorgeous script font with a ton of flourishes to work with. Another great, more traditional script (it seriously blows my marbles that it can pen like this) is his Mercy script. His Handmade font is perfect for so many vintage inspired projects that need a little edge, I’m thinking circus themed everything.  Let me stop blathering, you should go visit to see what he has to offer, I doubt you will be disappointed!

Author / Miss Tristan B

Miss Tristan B. is the co-creator of the world’s best + easiest product photography editing tool-Foto Rx | Shopkeeper’s Helper and one of the writer’s of this delightful blog. Her lofty goal here is to make this a creative resource repository and to inspire you to fall truly, madly, deeply in love with your life.