Stephanie Fishwick Interview Part II

Stephanie Fishwick Interview Part II via Besotted Blog

Thank you everyone to the positive feedback on Stephanie’s part I interview, so happy to hear that you love her as much as we do!  Stephanie did not hold back and I think you will find a ton of supplies + resources to look into after this interview. Also, a Happy Birthday to Stephanie is in order!  Thank you Stephanie so much for making this such an amazing interview!

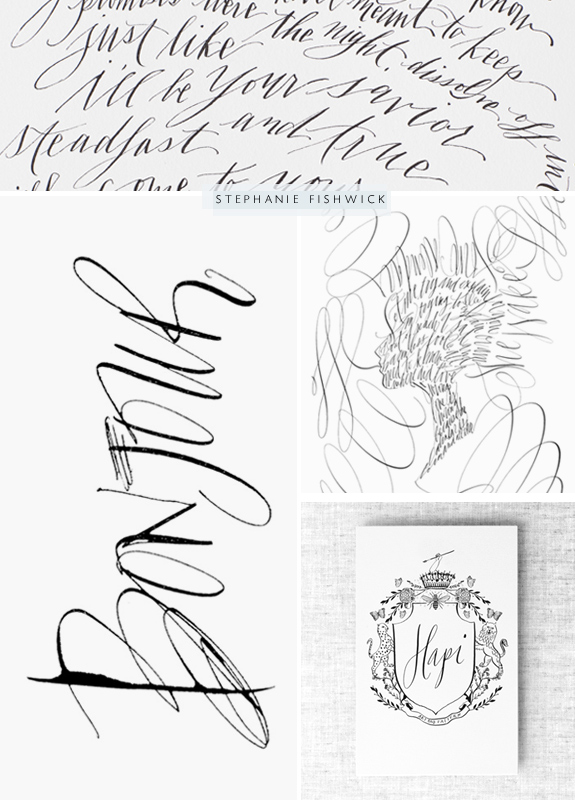
//STEPHANIE FISHWISCK INTERVIEW PART II//

What are some of your favorite supplies?

My favorite things now are my ruling pens and folded pen. I’m also loving a folded pen I made from a coke can. When doing pointed pen work, my favorite every-day supplies are the hourglass adjustable oblique pen holder with a Nikko G nib. The Tachikawa T-36 is my favorite straight holder. For brush lettering I use the Cotman 222 series brushes by Windsor & Newton, Rekab No. 314 Kolinsky Sable Brushes and various synthetic brushes with tiny tips. I love my bamboo brush. I use carbon-based black ink, pigmented ink for a luminous or crystalline look, and acrylic ink for color. Higgins Eternal is my favorite carbon-based ink. It’s great and very affordable and I go through black ink fast. I also love Moon Palace sumi ink. For acrylic work I am a big fan of Dr. Ph. Martins series. (Acrylic inks require more cleaning and attention to the nib, but I prefer them to gouache). I use a lot of watercolor in my work, as well. Favorite papers: hot press and cold press watercolor papers. For large final pieces I use 110 lb – 300 lb mould-made, pH neutral, papers that are 100% cotton. Some favorite brands are Fabriano, Aquarelle, Ingres and Arches. For things I will scan, as opposed to an original art piece, I like Canson Market Pro Layout or even 100% cotton resume paper that I find at an office supply store. The lower-end pads of Canson and Strathmore, cold-press 140lb paper for example, are great for my drafts or quick work.

Can you go a little into your process of how you work on a project?

My process is hard to describe. I had to ask my husband about his observations before I could put this into words! I write down ideas in lists a lot and mull things over in my head for a bit before drawing it out. I may spend two days thinking about an idea and then I’ll put it to paper in lots of different versions. Other times I’ll just want to do calligraphy without any goal in mind and come up with something I love. Many days I will sketch or write like 30 pages worth of quotes or words before I come up with the final piece that I like…or nothing good at all. Sometimes after writing a word 50 times I realize one of the first ones was my favorite. For client work I am way more scheduled and organized.

Any tips for newbies on how to develop their own style?

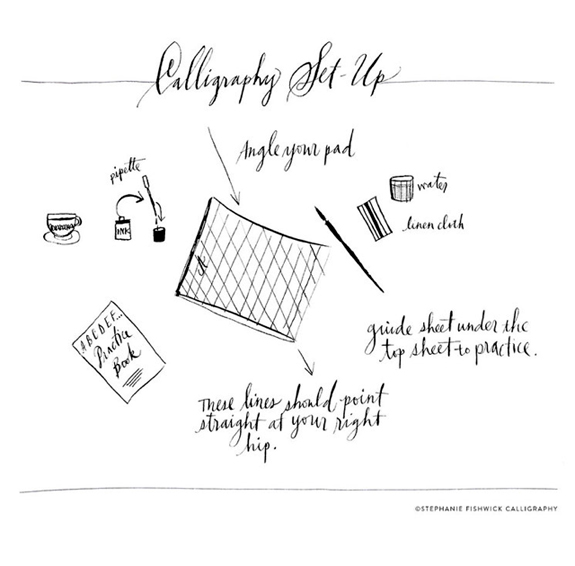
I would encourage newbies to learn Copperplate from a teacher who has mastered the form. Acquire the best materials, and set up a designated calligraphy work space for yourself. Everyone’s hand is different, so literally going with your flow will produce unique results. I think that any new styles work best when the architecture of the letters come from traditional copperplate.

Any recommendations of books or classes for lettering enthusiasts to further their studies?

Mastering Copperplate Calligraphy: A Step-by-Step Manual by Eleanor Winters, Calligraphy in the Copperplate Style by Herb Kaufman, Foundations of Calligraphy by Sheila Waters, Scripts: Elegant Lettering from Design’s Golden Age by Steven Heller and Louise Fili, Zanerian.com: Dr. Joe Vitolo’s site chock full of tutorials, lessons, guides, you-name-it, he’s got it covered., IAMPETH: The go-to for all-things pointed pen, and classes in your area. Check out your local guild for information on local classes. A Place to Flourish has a nice round-up of US Guilds.

Do you have some favorite projects you would like me to mention?

I create these little crests and wedding monograms and I recently launched a way for anyone to create their own custom piece on my site.

I’m working on a book cover right now that I’m really excited about. Last month I calligraphed tattoos for a couple celebrating their anniversary, which was just too cool.

Any advice on what ‘not’ to do?

Don’t doubt yourself as a lettering artist. I find it difficult to do that in the face of the internet, and basic human nature for comparison. I would say don’t get complacent in your study of fine art, its history, and your personal inspirations as you create your own style. This is something I am constantly working at.

Name one random talent you have that people may not know?

For a long time I was big into making artist books! I don’t make them anymore, but it fits well with calligraphy so maybe I will bring that back someday!


Stephanie Fishwick Interview Part I

stephaniefw_besottedinterview

This interview has been a long time coming and I have unfortunately (and unfairly) been sitting on it for way too long. How could I?  I will blame it on sleep deprivation, I hope both you and the talented Stephanie Fishwick will take that as a legitimate excuse and forgive me the long wait. I must preface this interview by saying that Stephanie’s work is a Besotted fave, we are uber fans, so much so that we tapped Stephanie to work on illustrations for our top secret project, that hopefully will not take as long to launch as this here interview.

If you are not familiar with her work I think you will be pleasantly surprised to discover such an amazingly, fresh, talented original artist. Stephanie’s interview is as thorough and detailed as her work, I think as a fellow lettering enthusiasts you will love it. So without further ado…

Read More

The Best Foundation Ever

bestfoundationeverviabesottedblog.com

I have been avoiding writing this post for awhile, I am loathe to recommend a beauty product that is so undeniably out of budget for most (and that includes me) but I couldn’t keep this to myself any longer. Let me start by saying, I did not buy my first bottle of Georgio Armani foundation, my former boss received a hideous candy bowl from Neiman Marcus one Christmas and let me have it to return, I did and was able to exchange it for my first bottle of foundation nirvana. Okay, let’s get the price out of the way, it’s the elephant in the room and once I blurt it out perhaps you can decide if you want to continue reading (do so at your own risk), the bottle will run you about $85 usd. Yes, you read that right, now go ahead and faint, I did.

So why bring this product up after years of keeping it to myself? I used to only wear this on very, very special occasions, I made it last as long as was hygienically feasible. Nowadays with baby any opportunity when I have enough energy to leave the house and not feel/look like a zombie is a special occasion, so I started wearing it, not knowing when my next very, very special occasion would ever be. I love it, I love the way it looks, the way it feels (the way I feel), how long it wears. So to throw out the blanket claim that it’s the best foundation ever may be a little bold, but it is, hands down the best foundation I have ever tried.  I have dry skin, but it seems to universally work on all skin types from all the reviews. Makeup artists will only use this on their A-list celebrities and trust me, a good make-up artist never wants to use the most expensive item just because it’s a luxury brand, their reputation is on the line, they just want to use the best period-Georgia Armani Luminous Silk Foundation is the best ever. There I said it.

Here’s some tips I have learned while I have been using it. NEVER use a brush or sponge. Why? It’s expensive and you will not want to waste one precious drop. A little goes a long way, I just dot it on my face and blend with my clean fingers, for blemishes or dark spots I still really like the Make Up Forever’s HD concealer, people have commented that it is as good (I think it’s better) then Cle De Peau (another insanely expensive item). I make sure it’s not near any heat, in a cool closet, which means it is never in the bathroom, I don’t want any temperature changes effecting my formulation.

I know it’s not for everyone and certainly not an everyday luxury for most, but if you have a once in a lifetime event to go to and want your skin to look perfect then I think you need this.  Let me know if you have any questions, I am happy to answer.  And for those that are shaking their head no way never, ever in a zillion years, I do have a new mineral foundation that I have also been wearing (and loving) and I promise to share soon!

Author / Miss Tristan B

Miss Tristan B. is the proprietress of Besotted Brand and the writer of this delightful blog. She recently re-located to sunny Seattle with her handsome husband and two pups, they just welcomed to the world a baby girl. Her lofty goal here is to make this a creative resource repository and to inspire you to fall truly, madly, deeply in love with your life.

Vintage Inspired Font Family

vintageinspiredfontviabesottedblog

I love a good font family, you? True North by Cultivated mind is truly a great find. If you have been itching to add a vintage family to your font arsenal so you could re-create all those popular hipster icons you see everywhere then I highly recommend it.  It’s also 50% off right now until August 9th, so I would scoop it up while they are practically giving it away.  Although, I like the family as a whole, (their sample graphics give plenty of jumping off inspiration to get you started on your own hipster design bonanza), what I really think is great (and versatile) is the script font it reminds me of another font that I have been coveting but at a fraction of the price (for now).  I like that it can easily be taken out of context here and used when there was a need for a school girl type font (for lack of a better descriptive). It’s just girly enough without verging into the too sweet category. I also like their banners (this is free!), labels and symbols (a good bear graphic is hard to find). Well, I better stop blabbering on about True North since time is running out on the discount and you need to get over there quick! See you soon!

P.S. If you ever use any of the fonts we suggest in your designs and want to share please send us an email, we would love to see what you have created!

Tethered Shooting + Photo Shoot Workflow

Shooting Tethered by Besotted Blog ii

Before you start thinking that as the photographer for the cover shoot, I got to boss people around for 2 days straight, you should know that in reality, every client shoot is truly a collaboration. In addition to myself, Tristan, and Sanae, we had Sanae’s Editor, and the Art Director on the team. Thankfully, they were absolutely delightful to work with, and we all shared the same goal for the shoot (creating a cover that was warm, welcoming, and true to Sanae).

We thought you might be curious about the nuts and bolts of the image workflow while collaborating on set. Tethering the camera to a laptop was an important first step. It is far more practical to have your images pop up on a laptop screen for the group to analyze than to make everyone huddle over the tiny LCD screen on the back of your camera. Even when you are shooting solo, it’s much easier to scrutinize an image on a larger screen, and all it takes is Lightroom and a tethering cord, so why not?

TetheringTutorialBesottedBlog

Here’s how to tether through Lightroom in 5 easy steps:

1. Plug in the tethering cord to your camera & laptop.

Note: a tethering cord is just a longer version of the cord provided with your camera to upload images to your computer. I have a 15’ cord which is plenty of length for my needs, but you can get them up to 65’ long!

2. Turn on your camera. (I told you the steps were easy.)

3. In Lightroom select: File > Tethered Capture > Start Tethered Capture

4. The Tethered Capture Settings window will pop up. Here you will name the session, decide how you’d like the files named, and choose a destination folder for your images. I recommend creating a project specific folder for your image destination to keep things tidy.

5. Once Lightroom detects your camera, your camera model and settings will display on a small tool bar. This bar also has a shutter release button. Meaning, if your camera is set up on a tripod or stable surface, you can snap a photo right from your laptop!

If you have any trouble, make sure the version of Lightroom you are using supports your camera model. I had to upgrade to Lightroom 5 to get support for mine.

Once we composed and captured a promising image, I took a quick screenshot of the image in Lightroom, then dragged the screenshot into our group project folder in Dropbox. This gave the Art Director instant access to the photo so she could pull it into Photoshop and mock up a cover – complete with title, subtitle, and author’s name. As you can imagine, instant feedback on what was or wasn’t working, brought tremendous value! We were able to make adjustments on the fly, and do everything we could to end up with the best possible cover image for Sanae.

On a personal note, I feel so honored to be a part of this project. It’s a joy to meet and work with people who not only have a passion for what they do, but can make a hard day of work fly by because they are fun to be around too. Also, shooting in Aran’s studio was a photographer’s dream, bright white with perfect northern light… do you think she’ll notice if I move in?

//FURTHER REFERENCES//

Lightroom Tethering Video Tutorial

Equipment Used for the Shoot

Photos above shot using VSCOCAM on an iphone 5

Author / Miss Michelle P.

Miss Michelle P. is a photographer, designer and co-professor for Souvenir Foto School. She lives in the Pacific Northwest. Her muse is light.

VICINITY STUDIO | PINTEREST | INSTAGRAM | TWITTER