HOW-TO EMBOSS WITH RUBBERSTAMPS | SUPPLIES PART I

Embossing Supplies Besotted Blog

I had originally created this tutorial for another blog that I admire, so much so that I didn’t think it was good enough for them, but I do hope you still like and garner some good info from it!  Recently I have had an onslaught of emails on using white ink with kraft paper (a wonderful combo!) and how the results people were getting were not as great as they had anticipated.  Firstly, I would like to preface this by saying stamping, even though it formerly has been relegated to the craft realm it is actually a legit printing technique and takes some practice. You wouldn’t expect to have no experience with letterpress printing and belly up to the machine and have a perfect go at it would you?  Of course not!  So, give yourself a break and assume your first trial runs will be less than what you desire. Practice makes perfect–pinky promise.

Although, I wholeheartedly believe you can get great results using this white ink, you can get even better (and more professional ones) by going the embossing route. Embossing is simply having the image you have stamped create a slight raised impression. Again, it is another technique that takes some practice but once you have it down you will be an ol’ pro at it in no time. Now let’s break down supplies!

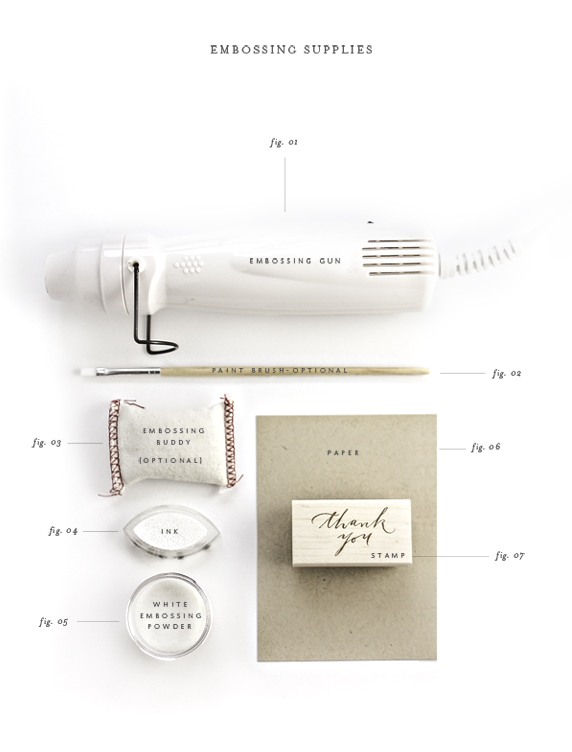
Fig. 01-The Embossing heat tool.  I own both the Martha Stewart version shown above and the Zap.  I hate to say this, but I think the Zap is better, but it’s pretty darn ugly and Martha’s tool isn’t too shabby.  (Note-A lot of the major craft stores such as Michael’s and A.C. Moore have weekly half off coupons that you can use to purchase your supplies at deep discounts.  Unfortunately, the coupons are for in-store use only). These are the two heat embossing tools I recommend, I have tried others but these both surpass anything else I have tried, unlike the embossing powder not all embossing heat tools are created equal.

Fig. 02-This is optional but I highly suggest a small, fine paintbrush to have on hand to brush off excess embossing powder from your surface, I bought mine for $1.00, you may even have one laying around. Fine one that is a little stiff as too soft will be hard to maneuver.

Fig. 03Embossing Buddy, I have this as optional and it is but gosh it so good, lasts forever and I doubt my finished embossing image would look as perfect without it. What this tool does is get rid of the static from your substrate (your cardstock) which will come in handy once we get to the actual embossing of this tutorial!

Fig. 04-Ink! Since I am discussing white with kraft, I think it’s safe to say get yourself some white ink, but you can emboss with any ink color your hear desires.  I prefer pigment inks when I am embossing they will stay wet longer than other inks.

Fig.05-Embossing powder-I really like this brand and my back-up choice would be this one. I have not noticed such a dramatic difference in embossing powders, so if you can’t find either of those, pick up what is available to you.  I chose white embossing ink for the tutorial but if you can only buy one powder get clear so you can use it with any color ink!

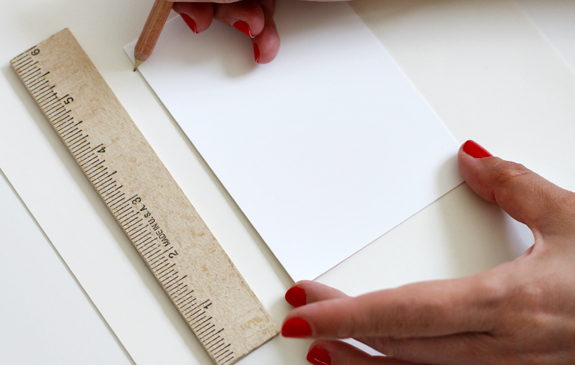
Fig. 06-Paper/Cardstock-I should mention a few things, what you stamp on makes a huge difference in your outcome, if you are using Kraft paper or chipboard find the smoothest one without too many fibers or something that is not too porous. I really like this kraft stock (it’s called Paper Bag) for it’s authentic look and extra smooth surface. I find a lot of kraft cardstock to be too fiber-filled to get a nice impression, but some chipboard works, it just takes a little experimenting.

Fig. 07-Rubberstamp-Not all stamps are good for this technique to create the most impressive results. I find a lot of my stamps work very well because they have nice thin lines and the embossing looks almost like thermography or better yet engraving when done right.  Stamps with more areas to cover like this one, are not as good of a choice because the embossing area will bubble and pop thus becoming bumpy, some people don’t mind that look, but I think it looks too ‘crafty’ and I never want my finished products to look ‘crafty’, I want people to pick them up and be wildly impressed that I made it and they will be don’t you worry, I promise to teach you how!

Tomorrow I will get to part II and later on this afternoon Michelle P. will be serving up a little Inspiration Rx for you!

P.P.S. We are in need of a videographer that needs to get their name out located in the Seattle area, if you have any leads or friends or even if you think YOU can do it, please email  me at besottedblog [at] gmail [dot] com a.s.a.p.!

Author / Miss Tristan B

Miss Tristan B. is the proprietress of Besotted Brand and the writer of this delightful blog. She recently re-located to sunny Seattle with her handsome husband and two pups, they are expecting a baby girl in December (possibly November). Her lofty goal here is to make this a creative resource repository and to inspire you to fall truly, madly, deeply in love with your life.

HOW-TO USE ALPHABET STAMPS

ALPHABET STAMP TUTORIAL IHappy Valentine’s Day to you!  I have received a ton of requests on tips on how to best use alphabet stamp sets and I am happy to oblige.  I love alphabet stamps (or ‘alpha’s’ as they are also known).  My biggest tip before I get further into this tutorial is if you start using these sets a lot then you might want to invest in more than one set of the same alphabet, it will make life so much easier.  If I needed a duplicate letter in my word above, say I wanted to spell ‘lovee’ then I would have to print what I have above then go back in with the ‘e’ and there’s a major chance (if you are me) that it will come out all crooked and wonky and ruin what I was working on. Granted, using alphabet stamps does not give you a perfectly straight word, by the nature of the stamping medium you will have very organic/rustic results, but you probably still want some control of the effect, right? Step. 1-I start out by finding the letters I would like to use for my word (like the example above), once I have the word I want I set the stamps as close and straight as possible to make it easier for Step. 2.

ALPHABET STAMP TUTORIAL IIStep 2-I cut a piece of artist/drafting tape long enough to wrap around the entire word.  This is important, if your tape is not long enough the stamps can bow, or become misaligned making this whole process futile. I use artist/drafting tape because it is re-positionable and is easy to remove and does not leave a sticky residue.  You could also try washi tape which also has a low tack adhesive and in a bind you could use masking tape, but it’s a bear to remove from your stamps so I wouldn’t recommend it.

ALPHABET STAMP TUTORIAL 3Step.3-Wrap the tape firmly around the stamps and get to printing!  I tried all sorts of techniques and this is by far the easiest + most convenient way to work with the alphabet sets.  If you have any other questions or requests feel free to email me or leave the request in the comments!

Author / Miss Tristan B

Miss Tristan B. is the proprietress of Besotted Brand and the writer of this delightful blog. She believes hand stamps are akin to owning miniature printing presses.

BLOGGING ADVICE–UNSOLICITED OF COURSE

The other day when I was visiting my new to me Tweet Deck, I saw that a few famous bloggers were lamenting the haters, the people (other bloggers) that seemingly did not like that they were getting paid for what they do (and what they do well). Blogging is an interesting industry and it may be the only one that another blogger (person in their field) would feel the ‘why not me?’ syndrome. If you are one of those I feel you, I do. I read a very heartfelt blog post the other day from a blogger that had been blogging since 2007 and she was wondering why she wasn’t making money blogging when she was spending hours upon hours editing her photographs.  In that same breath of venting she also mentioned that she did not like to do DIY, did not care for photography, food, fashion, etc. If she was going to write commentary on life she had no unique voice, she was neither charming, funny nor anything specific, she did not have a niche. Here’s my secret dear blogger (or aspiring blogger), it is the ‘information super highway’, if you want to make it as a blogger you need to give the world something they can’t find elsewhere.  No, it is not impossible.  The blogging climate has changed considerably since I started, I am the first one to admit that it is incredibly difficult to get your blog noticed these days, it is a hugely saturated market, BUT what do you have to offer that is different than what is out there?  Here’s another tip, you don’t need to blog–gasp!  No, really, if you can’t find time to blog on a regular basis, if you find yourself dreading blogging don’t do it, find another medium that you can’t stay away from be it Twitter, Pinterest, Tumblr, Dribble, Flickr, etc. When you love something it will be effortless and not feel like a chore.
Those ‘famous’ bloggers are also successful because of time, the way the internet works is that it notices that a blog/site has a plethora of information on ‘x’ subject, it has a lot of comments making it even more relevant, the internet ‘spiders’ will crawl for what is the most relevant information.  If these famous bloggers have been blogging for years they are unfortunately going to come up more often than a blog that just started writing about the same subject. So write about something that hasn’t been written about, write about something obscure/different that you love that is not easily found now on the interwebs.  There are a handful of blogs that are superb with truly original content and it breaks my heart that they aren’t at the top of the heap too, but it’s a 5% club folks, don’t take it personally, keep plugging away but only if it makes your heart sing.  I personally am the reluctant blogger, I don’t blog to be a blogger, which I have always said sounds awful like a ‘bad jogger’.  I blog because I am addicted, blogging has saved me from dark places and lifted me to lighter ones, it is my exercise and discipline. It connects me to the wide world around me which makes me feel richer.  I am not saying if a company wanted to sponsor posts here I would tell them to kick rocks barefoot, not at all, I am just saying that I have not built this space for that, I built it for you and you are what makes me feel like a success. When I started my first blog my husband gave me the most forlorn statistic of how many views the average blog gets (and that was 6 years ago), it was something very bleak. I don’t even read my stats, it’s not quantity but quality that I am after.  BUT if you are determined to make your fortune from blogging, than don’t give up, just be original and invest in your blog like you would any new business, brand it to the nines, find a name that is clever, easy to remember and unforgettable, post on a regular basis and don’t give up, because you will know you are doing your dream if it doesn’t feel like work, if it is effortless and the only thing holding you back is more time to do it. If you have specific questions, don’t be afraid to ask them, I am here for you.

GETTING HOLIDAY EDITORIAL + MORE SUPPLIES

I was emailing one of my cyber friends last night (that is a person that I don’t know in ‘real life’ but have become friendly via the interwebs) and mentioned that I have SO many new items to reveal for the shop. I seriously went on a little spree, but in my defense I need to be gearing up for holiday now, as holiday nearly killed me last year, I was seriously so not prepared.  For those that have shops/products this is the time when you need to be sending out your press kits to print magazines (they work on 3-6 month lead times). Me? No, I have not designed a press kit, nor can I even fathom doing so right now, do you know how long it takes me to make even the most minute decisions?  Ages. When I do I will photograph it and you will get a glimpse when I finish (maybe in the new year?) I was a fashion publicist for ions before I got into graphic design + branding (I have lived a long life), but what I know about fashion PR does not necessarily translate to what I am doing now.  Once I launch the apothecary + accessories I will be on sure footing but this totally odd concept of Stationery Stamps and the like, well it’s a hard sell. My outreach to blogs the other day made me feel about *this* big.  The most humiliating outreach was a girl with a now popular blog that had emailed me years ago to feature her line on my former blogs (I had two fairly large ones) which I did and she didn’t even write me back.  The internet is not always diplomatic, no she is not on vacation and I doubt it went to spam. I am assuming she doesn’t remember hocking her line before it got popular and that I had a hand in getting her there.  She is now on my mental ‘black list’.  You want to know what added salt to the wound?  Twitter recently recommended her as a ‘like you’ suggestion.  Like heck she’s not, I wanted to yell at the Twitter bots, I would never ignore anyone that ever helped me out, ever.  BUT back to your press kit for print media, it’s a simple premise really (even if you can’t put together cohesive sentences) you should be able to answer these questions: WHO / WHAT / WHERE / WHEN / WHY.  Once you do answer these simple questions put it on sheet of paper add your line sheet with RETAIL pricing and send it off to the editor of your favorite magazine.  Okay, I know you have more questions, but that will have to be for another lesson, you haven’t even put together your press kit right? Once you do than we can talk and hopefully you will get it together much sooner than I will.
P.S. The cardstock shown is limited edition double-sided stock, jet black on one side, bright white on the other, clever! You can get it here while supplies last.

HOW-TO CENTER YOUR RUBBERSTAMPS

This has been a much requested tutorial and for such an easy process it was surprisingly a lot of steps  to photograph!  I assure you this is the easiest way that I have found to be able to stamp an impression in the middle of my stationery flat.  I tried other equipment made specifically for stamping in the center of your cardstock, but found it a little complicated. I am also of the camp that believes less is more, if I don’t need to purchase any special equipment I won’t. So let’s gather our simple supplies. You will want to have the following supplies at your ready, we are going to create a template:
  • Piece of blank paper larger than the cardstock you want to center stamp on.
  • Writing utensil, preferably a pencil in case you make a mistake and need to erase.
  • A ruler
  • The cardstock size you want to be able to center stamp on.
Neatly trace your chosen cardstock onto your paper.  You are going to be using your template over and over again so if you want to use a weightier paper or even a thin cardstock as your template by all means go ahead.
Remove your chosen cardstock and there you have the very beginning of your template, which I know just looks like a penciled rectangle, but it shall become much more with a little tweak.
Now comes the hard part (I jest).  Find the center and draw a vertical 1″-2″ line. You have now created your center guidleline!
Ink your stamp, put your chosen cardstock on top of your template and you will see your center guideline clearly. Gently, but firmly press your stamp where in the center you would like your artwork to be, lift up (do not rock or jiggle). You should have a beautiful + centered impression!
ALTERNATE GUIDELINE CREATION OPTION:
For those of you who don’t want to use a ruler to find the center, just bend your cardstock in half and then use the folded center crease to create your guideline.
As always if you have any questions just ask them in the comments and I am happy to answer away.