
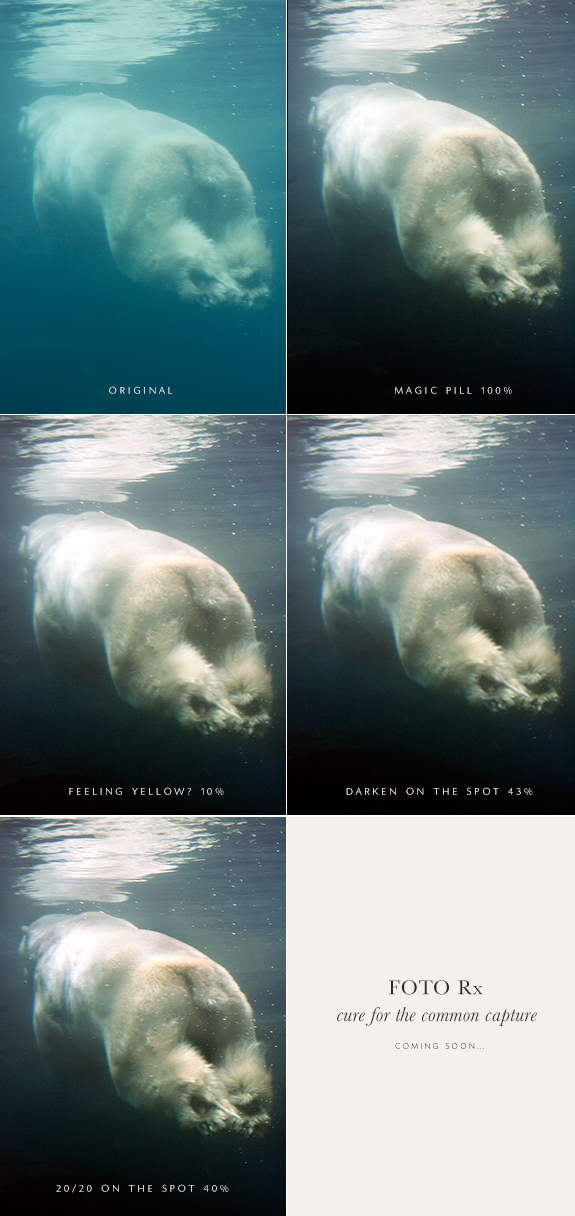
I think I am about to fall out of my seat from excitement that I can finally reveal one of the projects Michelle and I have been furiously working on these past months (you know, when we have been suspiciously m.i.a. from this here blog). I think I should back up a little in case you are a new reader and have no idea that I am a Photoshop ninja (truly), each year for the past four I took on as one of my 365 projects to edit a terrible photo a day for 365 days (I have never finished), it was always super labor intensive but the results always made me feel like I accomplished something, the problem is I could never keep up the pace, it was not conducive to working (or eating and sleeping). I do love a good before and after (see here and here and make sure you click the ‘before’ links!). During this period I did develop some tricks to make the process go faster, I use those same tricks on the photos I take for the blog (Michelle doesn’t really need my tricks, she’s a pretty darn good photographer straight out of camera), but we all have those days where we need to contend with the rogue color cast, or photo that we wished came out better (you just knew you nailed it when you shot it…), our Foto Rx actions should be the perfect prescription for curing any myriad of photo ailments! As you can see in our example above the ‘Original’ we used ‘Magic Pill’ (that’s only one Photoshop action folks!) it saved this photo (and memory) from being tossed into the trash bin. I could have stopped editing there, but I am prone to tinker (you?) and (full disclosure) I also wanted to show you some more of the goodies in our set. All of the actions are fully adjustable/non-destructive. We have been testing and know they work in CS3, CS5, CC 2014 (my new obsession) and most work in CS4 but we need to do a tweak on a couple. We are *this close* to launching the first (of many) Foto Rx Photoshop action sets, it has been a long time coming and to finally be this close to release date is just making me giddy! We hope you don’t mind us showing more samples in the coming weeks and I am so anxious to see what you can do with them. We want to make this a collaborative project and want to hear from you what types of actions you’d like to see in the future. Here’s to the ‘cure for the common capture’, may all your photos look aces and all your memories be saved!
For those that want a quick walk-thru on what I did and why:
Magic Pill-This action will usually fix a photo immediately, you just need to adjust to suit your taste, this I ran at 100%
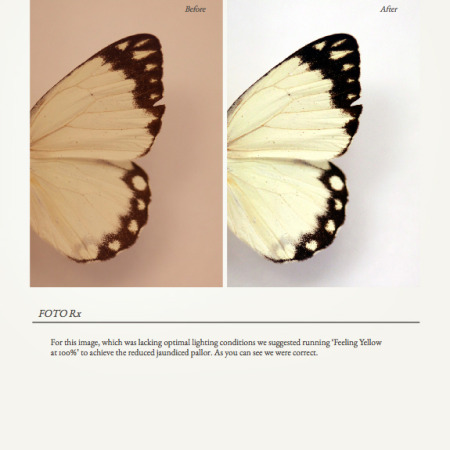
Felling Yellow?-This action adjusts a too yellow photo. I wanted to remove the yellow color cast from this image, as you can see I only have it at 10% opacity, it was a subtle color shift but I really liked the tweak.
Darken on the spot-This action allows you to ‘paint’ dark on select areas of your image. On this particular image I could see that I had some highlights on the fur (in the leg and back) that were looking a little blown out (thus not showing detail) I painted on the too light spots and brought back detail.
20/20 on the spot-This has been a favorite amongst our testers! It allows you to sharpen a specific area/detail of an image, this is great for eyes. I use it a ton when we shoot products. I chose to sharpen specific areas of the fur and water bubbles rather than doing a global sharpen because there were areas that I wanted to remain a little softened by the water.
Have any questions? Let us know!
Miss Tristan B. is the proprietress of Besotted Brand and one of the writer’s of this delightful blog. She lives in sunny Seattle with her handsome husband, wonderful baby girl and two pups. Her lofty goal here is to make this a creative resource repository and to inspire you to fall truly, madly, deeply in love with your life.


Could you be more talented?
how exciting!
I’m super excited for this!! On a somewhat related topic…I’m curious as to your thoughts on CC 2014 and the live trace feature in Illustrator…I loved CS5 and the live trace options for lettering, but Creative Cloud really makes me crazy. I cannot seem to figure out how to get a realistic look – everything is too vectorized. Any tips that you’ve foudn helpful, or do you use CS5 for your lettering? Thanks :)
I am so excited about this and can’t wait to try them out!
We are excited for you to try out as well!
Nikkol, I actually didn’t take on the CC for Illustrator, but finding the right setting is hard. Have you tried a Wacom tablet and stylus? I find that Live Trace leaves way too many points to make it look good for my tastes (and it’s SO hard to clean up those points!). I only use vector for lettering if I am going to print (like letterpress or off set) or doing signage where the lettering needs to be really huge, other than that for web I wouldn’t even bother with Illustrator, just clean scan it in super hi-res and clean it up in Photoshop:)
Hannah, I.know! This has been a long time coming!
Ah, thank you Jules, for both the visit and sweet compliment:)
I’m so excited about your new venture with Michelle and can’t wait to see more of your samples!